Product Spotlight
Pro Tips: How to Apply Nail Stickers Using OPI GelColor
When it comes to jumping on the nail sticker trend clients are asking for this season, there’s definitely a few tips to keep in mind for proper application!
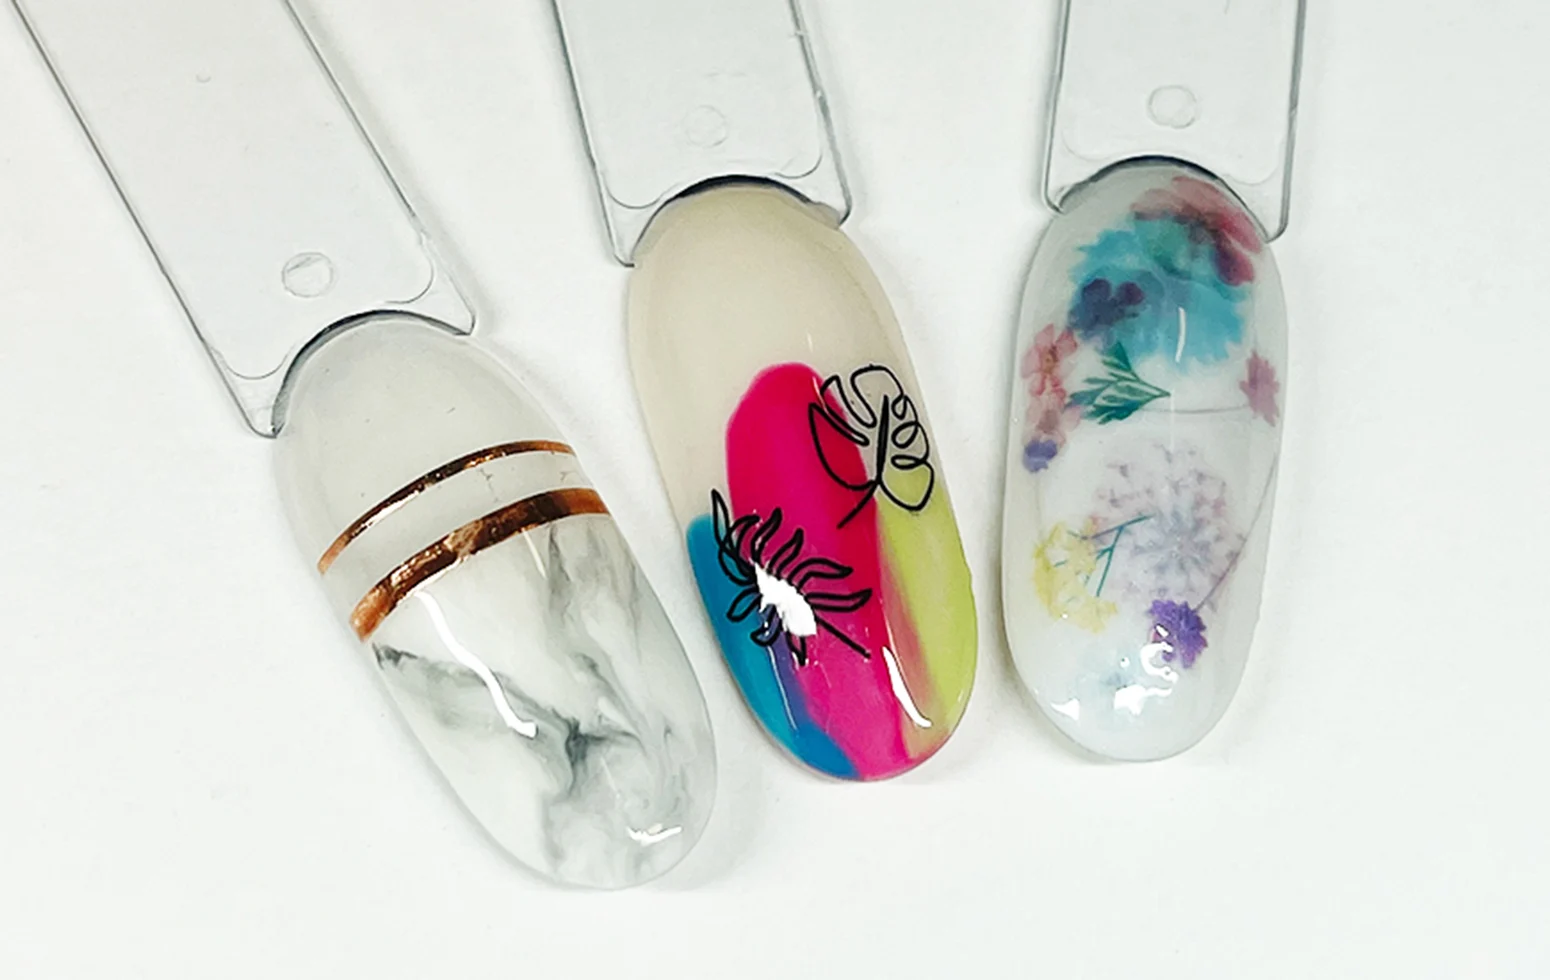
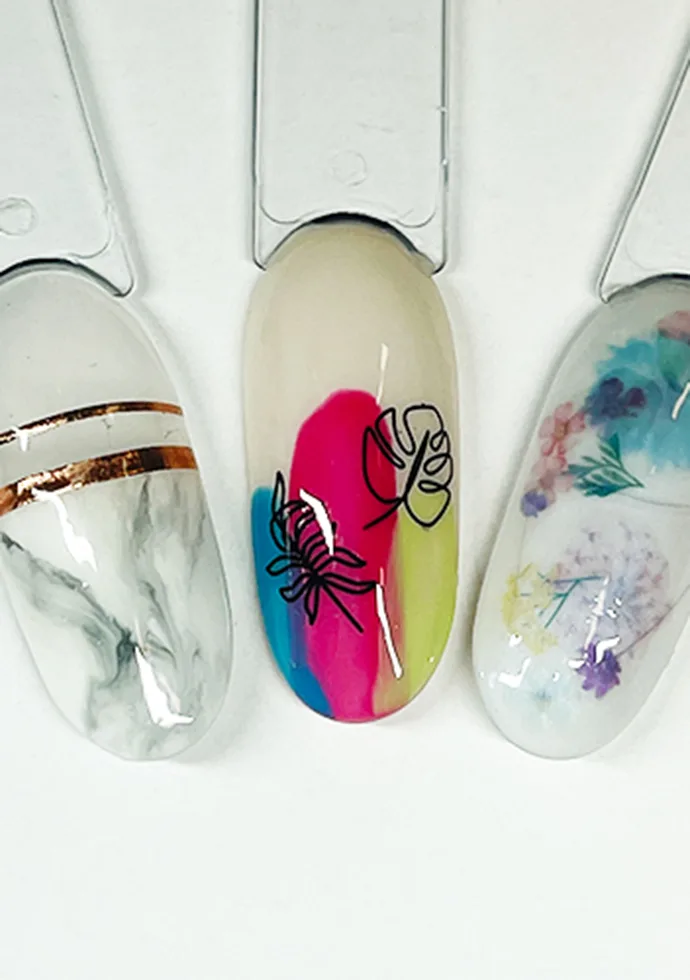
In case you missed our recent IG LIVE on social media, we’re recapping below some of the best tips from OPI Nail Artist Galdina Jimenez on proper application and how to achieve must-have looks. Read on and watch the video to find out how to enhance nail art trends like marble nails, abstract nail art, and even milk bath nails using fun nail stickers.
Get the Look: Marble Nail Art:
After proper OPI GelColor nail prep apply 1 coat of OPI GelColor Super Base Base Coat and cure 30 seconds in the OPI LED Light.
Apply one coat of OPI GelColor Alpine Snow® to half of the nail towards the tip. Cure 30 seconds.
Apply a second coat of Alpine Snow® (do not cure yet) and with a striper brush create a marble design using a mixture of OPI GelColor Black Onyx® and OPI GelColor Super Gloss Top Coat. Once the desired look is achieved, cure 30 seconds.
Cleanse off the inhibition layer with an Expert Touch Nail Wipe saturated in N.A.S. 99.
Pro Tip: This step is the most important to prevent the stickers from lifting!
Apply 2 horizontal nail sticker stripes above the marble nail art design. Make sure to cut off any excess sticker that might be hanging off the sidewalls of the nail.
Press the nail stickers down with a clean dry Expert Touch Lint Free Wipe to help remove bubbles.
Apply a thin coat of OPI GelColor Super Base Base Coat over the nail stickers to secure the nail stickers. Cure 30 seconds.
Apply one coat of OPI GelColor Super Gloss Top Coat. Cure 30 seconds. Cleanse off the inhibition layer with an Expert Touch Nail Wipe saturated in N.A.S. 99 to complete this marble nail art look!
Get the Look: Picasso Abstract Nail Art
After proper OPI GelColor nail prep apply 1 coat of OPI GelColor Super Base Base Coat and cure 30 seconds in the OPI LED Light.
Apply one coat of OPI GelColor Alpine Snow® to half of the nail towards the tip. Cure 30 seconds.
Apply two coats of OPI GelColor Be There in a Prosecco and cure each coat 30 seconds.
Using the Pro wide brush from the bottle, create a vertical swipe of OPI GelColor Strawberry Margarita in the center of the tip of the nail. Cure 30 seconds.
Follow with a swipe of OPI GelColor Can’t Find my Czechbook and repeat with OPI GelColor How Does Your Zen Garden Grow? on each side. Cure 30 seconds.
Cleanse off the inhibition layer with an Expert Touch Nail Wipe saturated in N.A.S. 99.
Pro Tip: This step is the most important to prevent the stickers from lifting!
Apply 2 nail stickers overlapping the design. Make sure to cut off any excess sticker that might be hanging off the sidewalls of the nail.
Press the nail stickers down with a clean dry Expert Touch Lint Free Wipe to help remove bubbles.
Apply a thin coat of OPI GelColor Super Base Base Coat over the nail stickers to secure them. Cure 30 seconds.
Apply one coat of OPI GelColor Super Gloss Top Coat. Cure 30 seconds. Cleanse off the inhibition layer with an Expert Touch Nail Wipe saturated in N.A.S. 99 to complete this abstract nail art look!
Get the Look: Milk Bath Nails
After proper OPI GelColor nail prep apply 1 coat of OPI GelColor Super Base Base Coat and cure 30 seconds in the OPI LED Light.
Apply 1 coat of OPI GelColor Funny Bunny®. Cure 30 seconds.
Cleanse off the inhibition layer with an Expert Touch Nail Wipe saturated in N.A.S. 99.
Pro Tip: This step is the most important to prevent the stickers from lifting!
Apply flower stickers throughout the nail, and be sure to avoid overlapping them. Make sure to cut off any excess sticker that might be hanging off the sidewalls of the nail.
Press the nail stickers down with a clean dry Expert Touch Lint Free Wipe to help remove bubbles.
Apply a second coat of Funny Bunny® to encapsulate the nail stickers and create the milk bath nail art look. Cure 30 seconds.
Cleanse off the inhibition layer with an Expert Touch Nail Wipe saturated in N.A.S. 99.
Apply a couple more nail stickers, repeating the steps above as needed.
Apply a thin coat of OPI GelColor Super Base Base Coat over the nail stickers to secure them. Cure 30 seconds.
Apply one coat of OPI GelColor Super Gloss Top Coat. Cure 30 seconds. Cleanse off the inhibition layer with an Expert Touch Nail Wipe saturated in N.A.S. 99 to complete this milk bath nail art look!
OPI Pro Tips: Do’s and Don’ts When Working With Nail Stickers and OPI GelColor
Follow us @OPI_Professionals and subscribe to our YouTube channel to stay up to date with the latest nail inspo and OPI Pro Tips.
